
Fixing Distortion and Pulling in Machine Embroidery
Fabric choice can affect how an embroidery design sits. Distortion and pulling often happen when fabric shifts or stretches under stitching. Thickness, bowing, and twisting can also affect how evenly a design forms.
If a finished design looks puckered or its edges seem out of line, the fabric may be part of the problem, not just the stitching. Thin or flexible material can move, while thicker fabric may affect how smoothly the needle and stitches pass through.
This guide explains how fabric thickness, bowing, and twisting contribute to embroidery distortion, what to look for in the finished work, and why fabric stability matters. Understanding how material and stitching interact can help you make more informed choices for your next machine embroidery project.
Key Takeaways
- Notice whether the fabric bows or twists, since movement can affect how the stitched design lies.
- Consider material thickness when assessing why stitching may not sit evenly across the fabric.
- Look at the fabric and the stitched result together to identify where distortion begins.
- Explore sports-themed embroidery designs to find a direction for your next machine embroidery project.
Table of Contents
Bowing and twisting
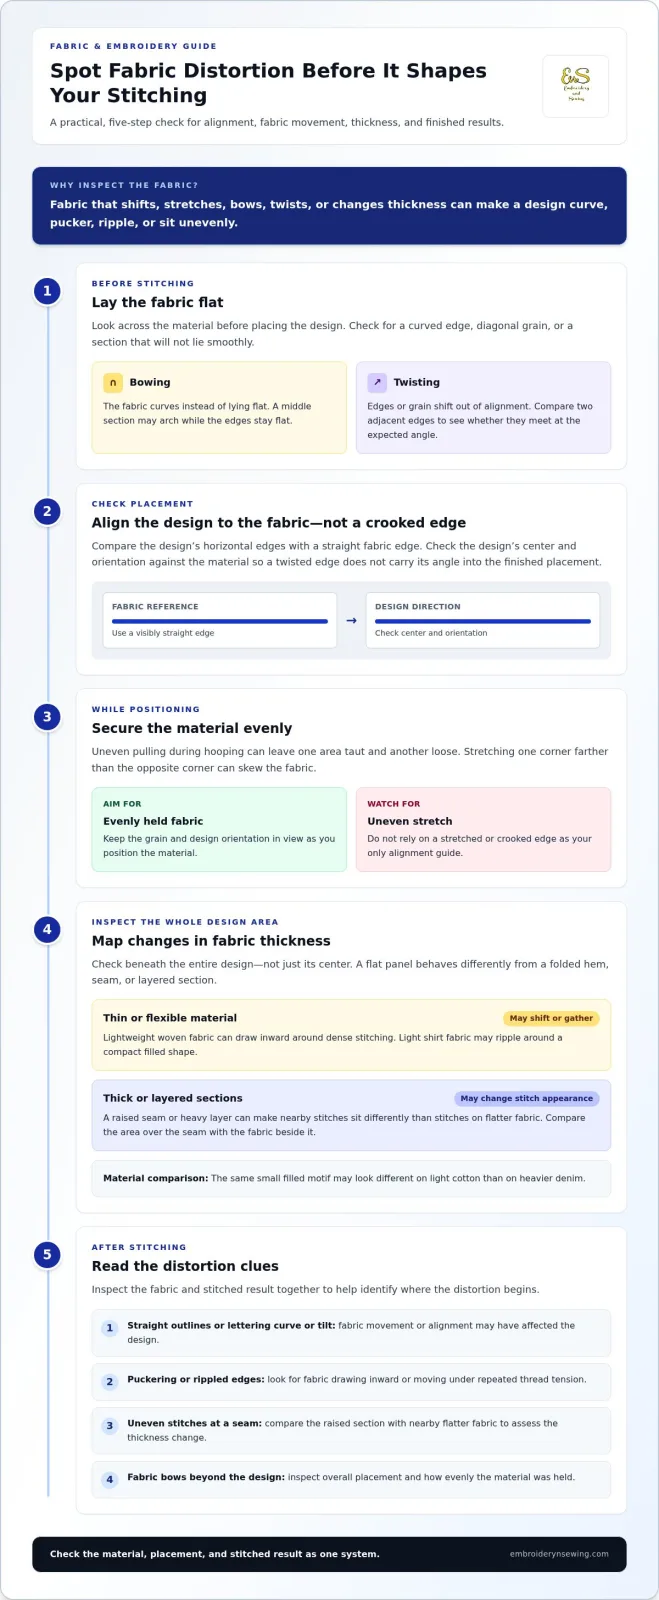
Bowing means the fabric curves instead of lying flat. Twisting means its edges or grain shift out of alignment. In machine embroidery, either can distort a design: a straight line may curve, while lettering can look tilted. Before stitching, compare the fabric’s sides with the design’s horizontal edges. If the lines do not align, the material may be positioned unevenly.
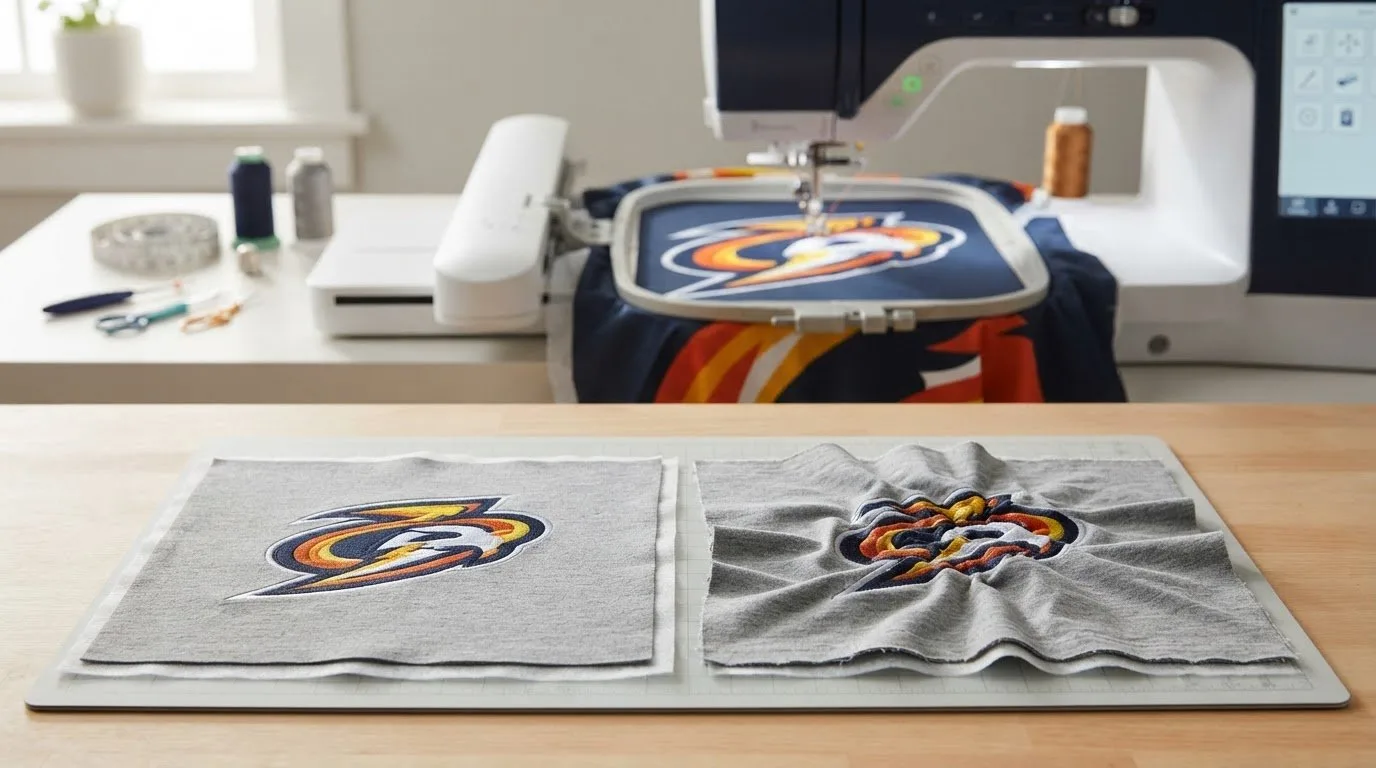
Stitching applies repeated thread tension to the fabric. If the material moves or stretches as the needle works, the stitched area may draw inward while the surrounding fabric stays relaxed. This difference can cause puckering, rippled edges, or an asymmetrical result. The effect may be easier to spot along a curved seam or near an uneven edge.
Check the fabric’s position before stitching. Lay it flat and look for a curved edge, diagonal grain, or a section that will not lie smoothly. Then compare the design’s direction with a straight fabric edge. If the design should appear level, aligning it with a visibly twisted edge can carry that twist into the finished placement.
-
For bowing: Look across the fabric’s width. A middle section that arches while the edges remain flat can shift the design’s apparent shape.
-
For twisting: Compare two adjacent edges. If they no longer meet at the expected angle, the fabric may be turned or stretched.
-
For design placement: Check the design’s center and orientation against the fabric, rather than relying on a crooked edge.
-
For the result: Inspect straight outlines and lettering first. Their curves or slants can reveal movement clearly.
Hooping can also affect how fabric lies. Pulling the material unevenly as you secure it can leave one area taut and another loose. For example, stretching one corner farther than the opposite corner can skew the fabric. Keep the grain and design orientation in view as you position the material, and do not rely on a stretched edge as your only alignment guide.
After stitching, check where the distortion appears. If the design itself curves, consider whether the fabric shifted during stitching. If the fabric bows beyond the design, inspect its overall placement and how evenly it was held. These observations can help distinguish an alignment issue from distortion limited to the stitched area, so you can adjust the setup next time.
Lay the fabric flat and compare its edges, grain, and design orientation to spot bowing or twisting. Check whether adjacent edges meet at the expected angle. Align the design with the fabric rather than a crooked edge, and secure the material evenly without stretching it.
Material thickness
Fabric thickness affects how the material responds as stitches build. Lightweight woven fabric can shift or draw inward around dense stitching, while thicker fabric may hold its shape differently. The same design can look smooth on one material and uneven on another. For example, compare a small filled motif on light cotton with the same motif on heavier denim. The contrast shows how the base material affects the finished appearance.
Thickness also changes the layers beneath the needle. A single layer behaves differently from a folded hem, seam, or layered section. At a bulky seam, the needle meets a raised area, and stitches may sit differently than they do on the flatter fabric beside it. This can make an outline look uneven or lettering less consistent. The change may come from stitching across varying material thickness, not from the design alone.
Thin material has less structure to resist the repeated movement of stitching. As the needle forms stitches, the fabric can gather near a dense area, creating puckers or a drawn-in edge. For instance, light shirt fabric may ripple around a compact filled shape more noticeably than a stable, heavier fabric. The amount of movement depends on the fabric’s structure and how much stitching is concentrated in one place.
Thicker material presents a different challenge. A heavy layer or intersecting seam raises the stitching surface, so nearby stitches may not lie as evenly as they do on a flat area. If a design crosses a thick seam, compare the stitches on the seam with those beside it. A visible change in stitch appearance may indicate that the difference in thickness is a contributing factor.
-
Identify the layers: Note whether the design crosses a fold, hem, seam, or layered area.
-
Compare nearby stitches: Look for puckering on thin sections and uneven coverage over bulky sections.
-
Check the placement: See whether the design sits mainly on a consistent area or crosses several thicknesses.
-
Assess the result: Distinguish fabric gathering from a change in stitch appearance at a raised section.
These factors help explain why distortion and pulling can vary across a project. A design placed entirely on a flat panel has a more consistent surface than one that crosses a seam and a thin section. Before stitching, inspect the material beneath the entire design area, not just the center. This can help you anticipate where changes in thickness may affect the finished embroidery.
Here at Embroidery n Sewing, we understand that managing different fabric weights is essential for achieving professional results. Thin fabrics require careful stabilization to prevent gathering, while bulky areas need proper clearance to maintain uniform stitch tension throughout your embroidery project.
Embroidery n Sewing: Sports Embroidery
Embroidery n Sewing offers sports embroidery designs for crafters planning a team-themed machine embroidery project. Once you have considered fabric thickness and alignment, choosing a design that suits the project is a useful next step. The collection also includes Buffalo Bills and Detroit Lions designs, giving fans team-focused options.
Choose a design theme that fits the fabric area you plan to embroider, then consider whether the material is even beneath the full design. Exploring sports project ideas in the embroidery articles can help you decide which theme suits your next project.
Visit Embroidery n Sewing to explore sports embroidery designs.
Make Your Next Embroidery Project Your Own
Start your next project with a design that suits your idea and the fabric you plan to stitch. Choosing the theme first gives you a clear direction for placement and helps you assess the material before embroidery begins. Matching the design to your project can make preparation more purposeful and the finished work closer to your vision.
To reduce distortion and pulling, consider the fabric at the start of each project. Embroidery n Sewing offers digital embroidery designs, machine embroidery designs, and college embroidery designs, with themes to explore as you plan. Choose a design that fits your project and bring that inspiration to your next creative session.
Contact Embroidery n Sewing to explore design options and find a theme for your next project. A considered choice is a great starting point for embroidery you’ll enjoy creating.