
# Master Embroidery Density for Flawless Designs
More stitches don’t automatically make an embroidery design look better. Too many can leave it stiff and heavy, while too few may let the fabric show through. If you’ve asked, “how does density effect the design and how do you adjust it?” the answer starts with how closely stitches sit together, not the total stitch count.
This guide explains how density affects coverage, fabric stability, and stitchability, and how to spot signs that it may be too high or too low. You’ll also learn why resizing or changing fabric can alter the result, and why underlay and other setup factors deserve a look before you change density. Use a test stitch to assess a focused adjustment before committing to it.
Key Takeaways
- Make a small, focused adjustment and test it before applying changes more broadly.
Table of Contents
What Embroidery Density Means, and How It Changes a Design
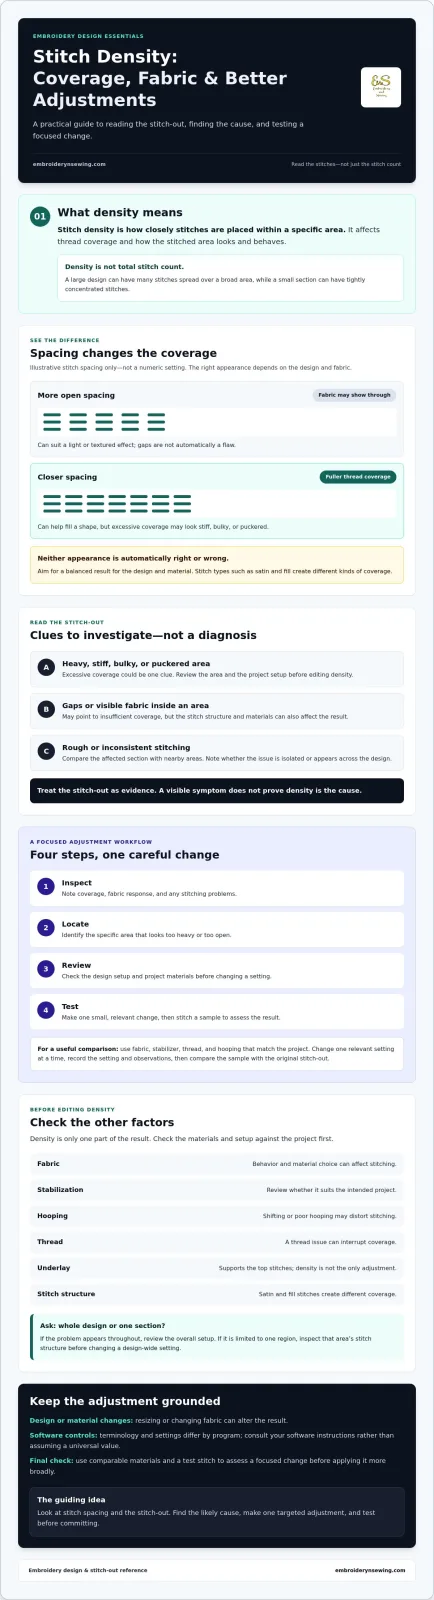
Stitch density is how closely stitches are placed within a specific area of an embroidery design. It affects how much fabric the thread covers and how the stitched area looks and behaves. Density is not the same as total stitch count: a large design may have many stitches spread over a broad area, while a smaller section can have tightly concentrated stitches.
In the computer-controlled embroidery process, stitch types such as satin and fill create different kinds of coverage. Density needs to be considered alongside stitch structure and project materials, rather than treated as one setting that works for every fabric or shape.
How stitch density affects coverage, detail, and fabric
Closely packed stitches can create fuller coverage, while more open stitching may let the base fabric show through. Neither appearance is automatically wrong. Open stitching may suit a light or textured effect, while denser coverage may help fill a shape. The goal is a balanced result for the design and material.
If stitching looks stiff, bulky, or puckered, excessive coverage could be one clue. Gaps or visible fabric inside an area may point to insufficient coverage, but neither symptom proves density is the cause. Fabric behavior, stabilization, hooping, thread, and stitch type can also affect the result. For examples of how stitch structure changes appearance, see this embroidery stitch visual guide.
Read the stitch-out as evidence, not a diagnosis. Compare the affected area with nearby sections and note whether the issue is consistent or isolated. Then consider the design and materials before deciding whether density needs attention. This helps avoid changing a setting when another part of the setup may be responsible.
How Does Density Effect the Design and How Do You Adjust?
Density changes the balance between thread coverage and the fabric beneath it. To decide whether to adjust it, first identify what you want to improve: an overly heavy stitched area, unexpected gaps, or a change in how the fabric sits. Check whether the issue is limited to one section or appears throughout the design. Then review the stitch structure and project setup before making a small, targeted change and testing it on comparable materials.
![How does density effect the design and how do you adjust]
How to Adjust Embroidery Density Without Guessing
Before changing a density setting, use the stitch-out to narrow down what needs attention. Look at where the result differs from the intended design, then check whether the issue appears across the whole design or only in one section. A dense-looking area, for example, may be caused by its stitch structure or setup rather than density alone.
Use this sequence to make a careful adjustment:
-
Inspect: Note coverage, fabric response, and any stitching problems.
-
Locate: Identify the specific area that looks too heavy or too open.
-
Review: Check the design setup and project materials before changing a setting.
-
Test: Make one small, relevant change, then stitch a sample to assess the result.
Software controls and terminology differ, so consult the instructions for your own program rather than relying on a universal setting or value. If you’re asking, “how does density effect the design and how do you adjust,” make a targeted change only after identifying the likely cause.
A practical test-stitch workflow for density changes
For a useful comparison, test with fabric, stabilizer, thread, and hooping that match the project. Change one relevant setting at a time, and record the setting and what you observe. Compare the sample with the original stitch-out, paying attention to coverage and fabric response. This lets you evaluate the change on comparable materials before using the revised design on the finished project.
Consistent hooping also makes results easier to compare. Review this embroidery hoop usage guide for hooping fundamentals. When your setup is ready, explore machine embroidery designs for ideas suited to your next project.
When to Adjust Density, and When to Check Something Else
Heavy coverage, visible gaps, or a rough stitch-out can suggest a density issue, but each is a clue, not a diagnosis. If a problem appears throughout the design, review the overall setup. If it’s limited to one region, inspect that area’s stitch structure before changing a design-wide setting.
Fabric choice, stabilization, hooping, thread, and underlay can all affect the result. Fabric that shifts or is poorly hooped may distort stitching, while a thread issue can interrupt coverage. Check these factors against your project before editing digitized settings. Underlay supports the top stitches, so don’t treat density as the only way to address an uneven result.
A simple decision check before editing a design
Ask whether the symptom affects the whole design or a specific section. Then confirm that your fabric, stabilizer, hooping, and thread suit the intended project. If those checks don’t explain the result, density may be worth reviewing. Use the stitch-out and setup checks to decide whether an edit is justified. For broader preparation, see this machine embroidery beginner guide.
Once your setup is ready, choose a digital embroidery design with a theme that fits your project, then test it on the intended materials before stitching the final piece. A searchable catalog with options such as sports, seasonal, floral, and children’s designs can help you find a suitable starting point.
Put Your Next Embroidery Project in Motion
Good density balances coverage with the needs of the design and project materials. If you’re asking “how does density effect the design and how do you adjust,” start by reading the stitch-out, checking other setup factors, and testing a careful change before committing to it. Heavy stitching or visible gaps are useful clues, but they don’t automatically prove density is the cause.
With a measured approach, you can adjust based on what your sample shows instead of guessing. Then choose a design that fits your project and materials. Embroidery n Sewing offers a broad, searchable catalog of downloadable machine embroidery designs, with immediate access to options for personalizing garments, gifts, and craft projects.
Explore digital embroidery designs for your next project, and bring your next creative idea to life one thoughtful stitch at a time.